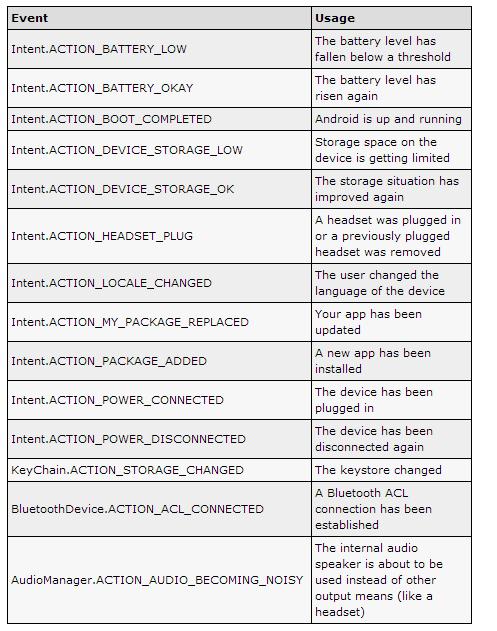
Broadcast Receiver là một trong các thành phần chính của android các bạn có thể hiểu nó như một bộ thu các bản tin cần thiết cho apps. Các bản tin được thu ở đây chính là các intent. Các bạn có thể thu các Intent sẵn có của hệ điều hành ví dụ như: tin nhắn đến, cuộc gọi đến, trạng thái của điện thoại, trạng thái của pin… Ngoài ra các bạn cũng có thể thu Intent của chính các bạn gửi ra để làm một nhiệm vụ gì đó (có thể dùng để start service khi cần).

Để các bạn có thể hiểu về Broadcast Receiver mình làm một app đơn giản có chức năng thu các tin nhắn đến, khi có tin nhắn đến mình sẽ log số điện thoại và nội dung tin nhắn đến. Ngoài ra mình còn tạo một buton để send một Intent và tự thu intent đó bằng receiver.
Để làm được ví dụ này các bạn làm lần lượt theo các bước sau
Bước 1: mở file res->values->String.xml
<?xml version="1.0" encoding="utf-8"?>


<resources>


<string name="app_name">IncomingSmsReceiver</string>

 <string name="action_settings">Settings</string>

 <string name="hello_world">Hello world!</string>

 <string name="sendAction">Send My Action</string>


</resources>
Bước 2: mở file res->layout-> activity_main.xml
<RelativeLayout xmlns:android="http://schemas.android.com/apk/res/android"


xmlns:tools="http://schemas.android.com/tools"

 android:layout_width="match_parent"

 android:layout_height="match_parent"

 tools:context=".MainActivity" >


<Button

 android:id="@+id/bt"

 android:layout_width="wrap_content"

 android:layout_height="wrap_content"

 android:text="@string/sendAction" />


</RelativeLayout>
Bước 3: tạo file SmsListenner.java trong packet com.basetut.servicetutorial
package com.example.incomingsmsreceiver;


import android.content.BroadcastReceiver;

import android.content.Context;

import android.content.Intent;

import android.os.Bundle;

import android.telephony.SmsMessage;

import android.util.Log;


public class SmsListenner extends BroadcastReceiver {


public void onReceive(Context context, Intent intent) {


// Retrieves a map of extended data from the intent.


// khi intent co action duoc khai bao trong manifest hdh se goi phuong thuc nay


 String strAction = intent.getAction();

 if (strAction.equalsIgnoreCase("android.provider.Telephony.SMS_RECEIVED")){

 // neu la action nhan SMS

 Log.d("debug", "onReceive: nhan ACTION: SMS_RECEIVED");

 final Bundle bundle = intent.getExtras();


try {

 if (bundle != null) {


final Object[] pdusObj = (Object[]) bundle.get("pdus");


for (int i = 0; i < pdusObj.length; i++) {


SmsMessage currentMessage = SmsMessage

 .createFromPdu((byte[]) pdusObj[i]);

 String phoneNumber = currentMessage

 .getDisplayOriginatingAddress();


// lay sdt gui tin nhan den va noi dung tin nhan

 String senderNum = phoneNumber;

 String message = currentMessage.getDisplayMessageBody();


// log sdt gui den va noi dung tin nhan ra logcat

 Log.d("debug","SmsReceiver:"+ " senderNum: " + senderNum

 + "; message: " + message);

 // cac ban co the xu ly du lieu nay theo nhu cau cua app

 } // end for loop

 } // bundle is null


} catch (Exception e) {

 Log.e("SmsReceiver", "Exception smsReceiver" + e);


}

 } else if (strAction.equalsIgnoreCase(MainActivity.ACTION)){

 Log.d("debug", "onReceive: nhan ACTION gui khi click button");

 String data = intent.getStringExtra("data");

 Log.d("debug", "data trong intent: "+ data);

 }

 }

}
Note: Bạn cần phải khai báo trong AndroidManifest.xml
<receiver android:name=”com.example.incomingsmsreceiver.SmsListenner” >

            <intent-filter>

                <action android:name=”android.provider.Telephony.SMS_RECEIVED” />

                <action android:name=”android.intent.action.BOOT_COMPLETED” />

                <action android:name=”TRUONGBS.fet.hut”/>

            </intent-filter>

 </receiver>
Trong đó các action
<action android:name=”android.provider.Telephony.SMS_RECEIVED” />

<action android:name=”android.intent.action.BOOT_COMPLETED” />
Là các intent mặc định hệ điều hành sẽ gửi ra khi nhận được tin nhắn và khi điện thoại boot complete(bật xong).
<action android:name=”TRUONGBS.fet.hut”/>
Là action tùy chỉnh của các bạn có thể tự định nghĩa và tự thu nó
Ngoài ra các bạn muốn thu thêm action nào thì có thể khai báo thêm các action trong thẻ
<intent-filter></intent-filter>
Bước 4: Mở file MainActivity.java
package com.example.incomingsmsreceiver;


import android.app.Activity;

import android.content.Intent;

import android.os.Bundle;

import android.view.View;

import android.view.View.OnClickListener;

import android.widget.Button;


public class MainActivity extends Activity {


// dinh nghia 1 action ma cac ban muon thu trong receiver

 public static final String ACTION = "TRUONGBS.fet.hut";


private Button bt;


@Override

 protected void onCreate(Bundle savedInstanceState) {

 super.onCreate(savedInstanceState);

 setContentView(R.layout.activity_main);

 bt = (Button) findViewById(R.id.bt);

 bt.setOnClickListener(new OnClickListener() {


@Override

 public void onClick(View v) {

 Intent mIntent = new Intent(ACTION);

 // cac ban co the truyen 1 so data can thiet va tu bat =

 // receiver

 mIntent.putExtra("data", "My Data");

 sendBroadcast(mIntent);

 }

 });


}


}
Note:
Các bạn có thể theo dõi kết quả thực hiện chương trình trên logcat và màn hình. . Khi làm theo ví dụ các bạn có gì không hiểu có thể để lại câu hỏi trên web mình sẽ trả lời các bạn một cách nhanh nhất có thể. Các bạn có thể down full src theo link dưới đây
IncomingSmsReceiver
Kết quả thực hiện chương trình

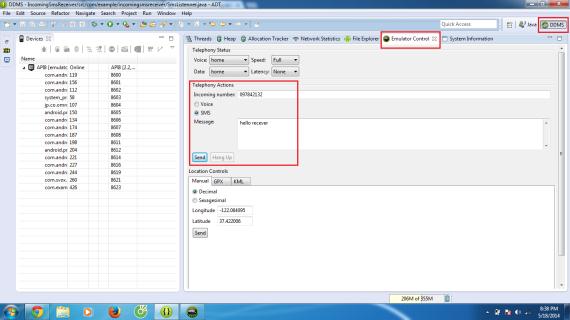
Mô phỏng việc gửi sms trong emulator

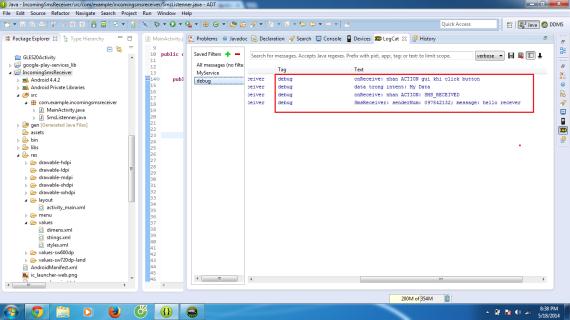
kết quả trên logcat
