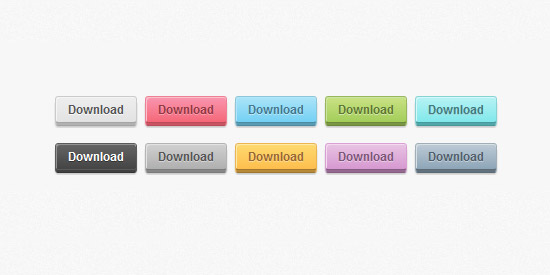
Hôm nay mình sẽ tiếp tục chia sẻ các đoạn css giúp các bạn tạo ra các nút bấm (button) dưới định dạng 3D đầy màu sắc và đẹp mắt. Qua bài viết này, các bạn sẽ có thêm nhiều lựa chọn hơn cho việc thiết kế các nút bấm cho web hay blog của mình.

Bước 1 : HTML Markup
Đầu tiên, chúng ta sẽ cần có bộ khung html để làm minh họa như sau :
<ul class="buttons">

    <li><a href="#" class="button gray">Download</a></li>

    <li><a href="#" class="button pink">Download</a></li>

    <li><a href="#" class="button blue">Download</a></li>

    <li><a href="#" class="button green">Download</a></li>

    <li><a href="#" class="button turquoise">Download</a></li>

    <li><a href="#" class="button black">Download</a></li>

    <li><a href="#" class="button darkgray">Download</a></li>

    <li><a href="#" class="button yellow">Download</a></li>

    <li><a href="#" class="button purple">Download</a></li>

    <li><a href="#" class="button darkblue">Download</a></li>

</ul>
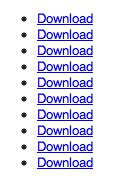
Và khi chúng ta nhìn trên trình duyệt, thì kết quả chỉ là thế này :

Bước 2 : Định dạng CSS
Các nút bấm của chúng ta vẫn chưa hoàn thành, và việc đầu tiên mà chúng ta cần làm là định dạng css cơ bản cho các nút bấm như sau :
ul { list-style: none; }

a.button {

    display: block;

    float: left;

    position: relative;

    height: 25px;

    width: 80px;

    margin: 0 10px 18px 0;

    text-decoration: none;

    font: 12px "Helvetica Neue", Helvetica, Arial, sans-serif;

    font-weight: bold;

    line-height: 25px;

    text-align: center;

}
Bây giờ chúng ta sẽ tiến hành định dạng cho từng màu khác nhau, vì số lượng màu nhiều nên mình chỉ minh họa màu xám (gray), các màu còn lại , các bạn có thể xem trực tiếp ở file css ở mục download hoặc demo của bài viết.
/* GRAY */

.gray,

.gray:hover {

    color: #555;

    border-bottom: 4px solid #b2b1b1;

    background: #eee;

}

.gray:hover { background: #e2e2e2; }
Sau khi định dạng với các màu sắc khác nhau xong, chúng ta sẽ nhận được kết quả thế này :

Kế tiếp, chúng ta sẽ chèn thêm đường viền cho các nút bấm bằng cách tận dụng :before và :after pseudo-elements.
a.button:before,

a.button:after {

    content: '';

    position: absolute;

    left: -1px;

    height: 25px;

    width: 80px;

    bottom: -1px;

}

a.button:before {

    height: 23px;

    bottom: -4px;

    border-top: 0;

}
Và dĩ nhiên , mỗi màu sẽ có một đường viền riêng của nó, ở đây mình vẫn chỉ làm minh họa cho màu xám :
/* GRAY */

.gray,

.gray:hover {

    color: #555;

    border-bottom: 4px solid #b2b1b1;

    background: #eee;

}

.gray:before,

.gray:after {

    border: 1px solid #cbcbcb;

    border-bottom: 1px solid #a5a5a5;

}

.gray:hover { background: #e2e2e2; }

Bây giờ là lúc mà chúng ta sẽ tạo hiệu ứng 3D cho các nút bấm bằng các tính năng mới mà CSS3 mang lại. Đầu tiên là chúng ta sẽ tạo góc bo tròn cho các nút bấm. Các bạn thêm đoạn css sau vào cho phần khai báo nút bấm ban đầu :
a.button {

  .....

  .....

    -webkit-border-radius: 3px;

    -moz-border-radius: 3px;

    border-radius: 3px;

}
Và dĩ nhiên , các định dạng :before và :after cũng có bo tròn luôn, ngoài ra chúng ta sẽ chèn thêm các hiệu ứng bóng đổ .
a.button:before,

a.button:after {

   .....

   .....

   .....

    -webkit-border-radius: 3px;

    -moz-border-radius: 3px;

    border-radius: 3px;

}

a.button:before {

   .....

   .....

    -webkit-border-radius: 0 0 3px 3px;

    -moz-border-radius: 0 0 3px 3px;

    border-radius: 0 0 3px 3px;

    -webkit-box-shadow: 0 1px 1px 0px #bfbfbf;

    -moz-box-shadow: 0 1px 1px 0px #bfbfbf;

    box-shadow: 0 1px 1px 0px #bfbfbf;

}
Cuối cùng là chúng ta sẽ chèn thêm màu nền gradient và hiệu ứng inner shadow, text shadow riêng biệt cho mỗi màu. Chúng ta sẽ khai báo thêm:visited để ngăn ngừa lỗi trên IE6.
/* GRAY */

a.gray,

a.gray:hover,

a.gray:visited {

    color: #555;

    border-bottom: 4px solid #b2b1b1;

    text-shadow: 0px 1px 0px #fafafa;

    background: #eee;

    background: -webkit-gradient(linear, left top, left bottom, from(#eee), to(#e2e2e2));

    background: -moz-linear-gradient(top,  #eee,  #e2e2e2);

    box-shadow: inset 1px 1px 0 #f5f5f5;

}

.gray:before,

.gray:after {

    border: 1px solid #cbcbcb;

    border-bottom: 1px solid #a5a5a5;

}

.gray:hover {

    background: #e2e2e2;

    background: -webkit-gradient(linear, left top, left bottom, from(#e2e2e2), to(#eee));

    background: -moz-linear-gradient(top,  #e2e2e2,  #eee);

}
Ngoài ra, chúng ta cũng sẽ định dạng css cho các nút bấm khi được click vào như sau :
/* ACTIVE STATE */

a.button:active {

    border: none;

    bottom: -4px;

    margin-bottom: 22px;

    -webkit-box-shadow: 0 1px 1px #fff;

    -moz-box-shadow:  0 1px 1px #fff;

    box-shadow:  1px 1px 0 #fff, inset 0 1px 1px rgba(0, 0, 0, 0.3);

}

a.button:active:before,

a.button:active:after {

    border: none;

    -webkit-box-shadow: none;

    -moz-box-shadow: none;

    box-shadow: none;

}

Bước 3 : Tạo phương án dự phòng cho các trình duyệt cũ
Mặc dù các nút bấm của chúng ta đã rất đẹp , tuy nhiên , các trình duyệt cũ như IE8 trở xuống chẳng hạn, sẽ không hiểu những thuộc tính có trong CSS3, vì thế chúng ta sẽ sử dụng thư viện Javascript Modernizr. Nếu bạn nào chưa biết về Modernizr thì có thể tham khảo bài viết Modernizr là gì ? Và cách sử dụng nó cho những trình duyệt cũ mà mình đã giới thiệu ở bài viết trước. Sau khi cài đặt xong Modernizr, các bạn copy đoạn css sau :
/* MODERNIZR FALLBACK */

.no-cssgradients a.button, .no-cssgradients a.button:visited,

.no-borderradius a.button, .no-borderradius a.button:visited,

.no-generatedcontent a.button, .no-generatedcontent a.button:visited {

    background: url(images/sprite.png) no-repeat 0 0px;

    height: 32px;

    width: 82px;

}

.no-cssgradients a.button:hover,

.no-borderradius a.button:hover,

.no-generatedcontent a.button:hover {

    background: url(images/sprite.png) no-repeat 0 -32px;

}

.no-cssgradients a.button:active,

.no-borderradius a.button:active,

.no-generatedcontent a.button:active {

    background: url(images/sprite.png) no-repeat 0 -64px;

    bottom: 0;

    line-height: 35px;

}

.no-cssgradients a.gray,

.no-cssgradients a.gray:visited,

.no-cssgradients a.gray:hover { background-position-x: 0; }

.no-cssgradients a.pink,

.no-cssgradients a.pink:visited,

.no-cssgradients a.pink:hover { background-position-x: -82px; }

.no-cssgradients a.blue,

.no-cssgradients a.blue:visited,

.no-cssgradients a.blue:hover { background-position-x: -164px; }

.no-cssgradients a.green,,

.no-cssgradients a.green:visited,

.no-cssgradients a.green:hover { background-position-x: -246px; }

.no-cssgradients a.turquoise,

.no-cssgradients a.turquoise:visited,

.no-cssgradients a.turquoise:hover { background-position-x: -328px; }

.no-cssgradients a.black,

.no-cssgradients a.black:visited,

.no-cssgradients a.black:hover { background-position-x: -410px; }

.no-cssgradients a.darkgray,

.no-cssgradients a.darkgray:visited,

.no-cssgradients a.darkgray:hover { background-position-x: -492px; }

.no-cssgradients a.yellow,

.no-cssgradients a.yellow:visited,

.no-cssgradients a.yellow:hover { background-position-x: -574px; }

.no-cssgradients a.purple,

.no-cssgradients a.purple:visited,

.no-cssgradients a.purple:hover { background-position-x: -656px; }

.no-cssgradients a.darkblue,

.no-cssgradients a.darkblue:visited,

.no-cssgradients a.darkblue:hover { background-position-x: -738px; }

.no-cssgradients a.button, .no-cssgradients a.button:visited, .no-cssgradients a.button:hover, .no-cssgradients a.button:before, .no-cssgradients a.button:after,

.no-borderradius a.button, .no-borderradius a.button:visited, .no-borderradius a.button:hover, .no-borderradius a.button:before, .no-borderradius a.button:after,

.no-generatedcontent a.button, .no-generatedcontent a.button:visited, .no-generatedcontent a.button:hover, .no-generatedcontent a.button:before, .no-generatedcontent a.button:after {

    border: 0;

}
Trong đoạn css trên, chúng ta có sử dụng một hình ảnh là sprite.png, hình này các bạn có thể tìm thấy ở mục download bài viết. Nếu trong quá trình thực hiện bài viết, các bạn gặp khó ở bước nào, thì đừng ngần ngại để lại lời nhắn dưới dạng comments, mình sẽ giúp các bạn hoàn thành bài viết này.