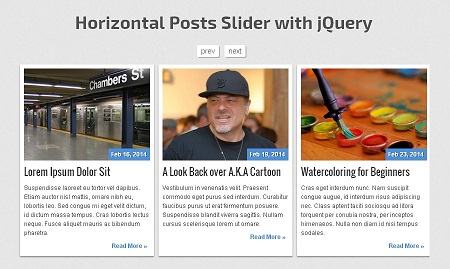
Bạn đang quản lý một trang blog, hay đang thiết kế một trang tạp chí có nhiều bài viết trên trang web của mình, thì slider mà mình chia sẻ cho các bạn trong bài viết này sẽ giúp ích khá nhiều cho các bạn. Slider này có khả năng Responsive, tự động quay lại bài viết khi hết bài, thiết kế gọn gàng, dễ dàng đặt nó ở bất kì vị trí nào trên trang web. Đặc biệt hơn, để tạo ra nó, các bạn chỉ cần sử dụng vài đoạn code đơn giản sau đây.

Download
HTML
Đầu tiên là chúng ta có một bộ điều hướng để điều khiển slider.
<nav class="slidernav">

    <div id="navbtns" class="clearfix">

      <a href="#" class="previous">prev</a>

      <a href="#" class="next">next</a>

    </div>

</nav>
Sau đó là khung html chuẩn cho bài viết.
<div class="crsl-items" data-navigation="navbtns">

    <div class="crsl-wrap">

      <div class="crsl-item">

        <div class="thumbnail">

          <img src="img/thumb01.jpg" alt="nyc subway">

          <span class="postdate">Feb 16, 2014</span>

        </div>


        <h3><a href="#">Lorem Ipsum Dolor Sit</a></h3>


        <p>Suspendisse laoreet eu tortor vel dapibus....</p>


        <p class="readmore"><a href="#">Read More »</a></p>

      </div><!-- post #1 -->
CSS
Sau đó các bạn dùng đoạn css sau để định dạng slider.
/** posts slider widget **/

.crsl-items {

  display: block;

  padding: 5px;

}


.crsl-item {

  background: #fff;

  padding: 8px;

  -webkit-box-shadow: 0 2px 3px rgba(0,0,0,0.4);

  -moz-box-shadow: 0 2px 3px rgba(0,0,0,0.4);

  box-shadow: 0 2px 3px rgba(0,0,0,0.4);

}


.crsl-item .thumbnail {

  display: block;

  position: relative;

  margin-bottom: 10px;

  cursor: pointer;

}

.crsl-item .thumbnail img {

  display: block; /* fix 1px image space http://stackoverflow.com/q/5804256/477958 */

  -webkit-transition: all 0.3s linear;

  -moz-transition: all 0.3s linear;

  transition: all 0.3s linear;

}

.crsl-item .thumbnail:hover img {

  opacity: 0.8;

}


.crsl-item h3 {

  font-family: 'Oswald', 'Trebuchet MS', Helvetica, sans-serif;

  font-size: 1.95em;

  line-height: 1.25em;

  margin-bottom: 12px;

}

.crsl-item h3 a {

  text-decoration: none;

  color: #333;

}

.crsl-item h3 a:hover {

  text-decoration: underline;

}


.crsl-item .postdate {

  display: block;

  position: absolute;

  bottom: 0;

  right: 0;

  padding: 6px;

  color: #fff;

  text-shadow: 1px 1px 0 rgba(0,0,0,0.4);

  font-size: 1.2em;

  font-weight: bold;

  background: #4e90da;

}


.crsl-item p {

  font-size: 1.2em;

  line-height: 1.55em;

  margin-bottom: 5px;

}


.crsl-item p.readmore a {

  display: block;

  float: right;

  color: #4e90da;

  padding: 3px 5px;

  text-decoration: none;

  font-weight: bold;

  -webkit-border-radius: 3px;

  -moz-border-radius: 4px;

  border-radius: 4px;

}

.crsl-item p.readmore a:hover {

  background: #4b6caa;

  color: #fff;

}
Và định dạng cho nút điều hướng.
/** posts slider nav **/

.slidernav {

  display: block;

  text-align: center;

  margin-bottom: 5px;

}


.slidernav a {

  display: inline-block;

  padding: 5px 8px;

  margin-right: 8px;

  font-size: 1.4em;

  background: #fff;

  color: #666;

  text-decoration: none;

  -webkit-border-radius: 3px;

  -moz-border-radius: 3px;

  border-radius: 3px;

  -webkit-box-shadow: 2px 2px 0px rgba(0,0,0,0.2);

  -moz-box-shadow: 2px 2px 0px rgba(0,0,0,0.2);

  box-shadow: 2px 2px 0px rgba(0,0,0,0.2);

}

.slidernav a:active {

  -webkit-box-shadow: 1px 1px 0 rgba(0,0,0,0.2);

  -moz-box-shadow: 1px 1px 0 rgba(0,0,0,0.2);

  box-shadow: 1px 1px 0 rgba(0,0,0,0.2);

}
Cuối cùng là tạo khả năng Responsive cho toàn bộ slider.
/** media queries **/

@media screen and (max-width: 660px) {

  h1 { font-size: 2.4em; line-height: 1.2em; }


  .crsl-item h3 { font-size: 1.65em; }

}


/** clearfix **/

.clearfix:after { content: "."; display: block; clear: both; visibility: hidden; line-height: 0; height: 0; }

.clearfix { display: inline-block; }


html[xmlns] .clearfix { display: block; }

* html .clearfix { height: 1%; }
jQuery
Để slider hoạt động, chúng ta sẻ sử dụng plugin responsiveCarousel.min.js, plugin này các bạn có thể tải về tại mục download. Đồng thời các bạn khởi tạo plugin với những dòng code sau :
$(function(){

  $('.crsl-items').carousel({

    visible: 3,

    itemMinWidth: 180,

    itemEqualHeight: 370,

    itemMargin: 9,

  });


  $("a[href=#]").on('click', function(e) {

    e.preventDefault();

  });

});