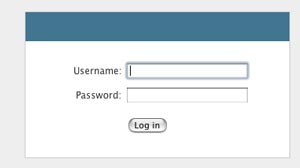
Nếu bạn cần 1 trang đăng nhập cho web của bạn thì bài viết này sẽ rất giúp ích cho bạn, tuy chỉ là một trang đăng nhập đơn giản, nhưng nó chứa tất cả những kiến thức và kỹ năng cơ bản của một trang đăng nhập. Nào hãy cùng mình đi từng bước nhá.
Bước 1 : Tạo database và table
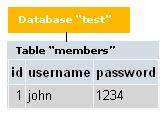
Trong ví dụ này chúng ta sẽ đặt tên database là ” test “ và tạo một table là “members”

CREATE TABLE `members` (

`id` int(4) NOT NULL auto_increment,

`username` varchar(65) NOT NULL default '',

`password` varchar(65) NOT NULL default '',

PRIMARY KEY (`id`)

) TYPE=MyISAM AUTO_INCREMENT=2 ;

--

-- Dumping data for table `members`

--

INSERT INTO `members` VALUES (1, 'john', '1234');
Bước 2 : Tạo file ” main_login.php “
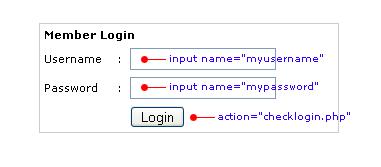
File đầu tiên mà chúng ta cần tạo là main_login.php, đây là trang hiển thị form đăng nhập như hình dưới đây:

Các bạn dán (paste) đoạn code sau vào file này:
<table width="300" border="0" align="center" cellpadding="0" cellspacing="1" bgcolor="#CCCCCC">
<tr>
<form name="form1" method="post" action="checklogin.php">
<td>
<table width="100%" border="0" cellpadding="3" cellspacing="1" bgcolor="#FFFFFF">
<tr>
<td colspan="3"><strong>Member Login </strong></td>
</tr>
<tr>
<td width="78">Username</td>
<td width="6">:</td>
<td width="294"><input name="myusername" type="text" id="myusername"></td>
</tr>
<tr>
<td>Password</td>
<td>:</td>
<td><input name="mypassword" type="text" id="mypassword"></td>
</tr>
<tr>
<td> </td>
<td> </td>
<td><input type="submit" name="Submit" value="Login"></td>
</tr>
</table>
</td>
</form>
</tr>
</table>
Bước 3 : Tạo file ” checklogin.php “
File này được dùng để kiểm tra xem người dùng sau khi nhập username và password xong có đúng hay không, và nó cũng kiểm tra xem user đó đã tồn tại hay chưa, nếu người dùng nhập đúng tài khoản của họ thì nó sẽ tự động chuyển sang trang thông báo “login_success.php” và ngược lại nó sẽ thông báo lỗi đăng nhập
Các bạn dán đoạn code sau vào file checklogin.php :
<?php


$host="localhost"; // luôn luôn là localhost

$username="root"; // user của mysql

$password=""; // Mysql password

$db_name="test"; // tên database

$tbl_name="members"; // tên table


// kết nối cơ sở dữ liệu

mysql_connect("$host", "$username", "$password")or die("Không thể kết nối");

mysql_select_db("$db_name")or die("cannot select DB");


// username và password được gửi từ form đăng nhập

$myusername=$_POST['myusername'];

$mypassword=$_POST['mypassword'];


// Xử lý để tránh MySQL injection

$myusername = stripslashes($myusername);

$mypassword = stripslashes($mypassword);

$myusername = mysql_real_escape_string($myusername);

$mypassword = mysql_real_escape_string($mypassword);


$sql="SELECT * FROM $tbl_name WHERE username='$myusername' and password='$mypassword'";

$result=mysql_query($sql);

$count=mysql_num_rows($result);

// nếu tài khoản trùng khớp thì sẽ trả về giá trị 1 cho biến $count

if($count==1){


// Lúc này nó sẽ tự động gửi đến trang thông báo đăng nhập thành công

session_register("myusername");

session_register("mypassword");

header("location:login_success.php");

}

else {

echo "Sai tên đăng nhập hoặc mật khẩu";

}

?>
Bước 4 : Tạo file ” login_success.php “
Như mình đã nói ở bước 3 , file này sẽ xuất hiện dòng thông báo đăng nhập thành công.
Các bạn dán đoạn code sau :
<?php

session_start();

if(!session_is_registered(myusername)){

header("location:main_login.php");

}

?>

<html>

<body>

Đăng nhập thành công !

</body>

</html>
Bước 5 : Tạo file ” Logout.php “
File này được dùng để thoát tài khoản , các bạn dán đoạn code sau, đoạn code này sẽ xóa bỏ hết các session
<?php

session_start();

session_destroy();

?>
Xin chúc mừng các bạn đã hoàn thành xong trang đăng nhập.